A few weeks ago I got a call from Chad, the owner of Red Barn Bicycles. I met Chad this past summer when his wife Tracey was riding the Fitz-Barn Ride like I was. I rode with Tracey for many miles, and felt incredibly welcomed to the finish at Red Barn Bicycles when Chad, Tracey and everyone hanging at Red Barn came out to cheer me into the finish line (complete with finish tape!).
Anyway, Chad just got himself a Surly Moonlander and he asked me to make a framebag for him. Chad asked me for a frame bag that will accommodate his hydration reservoir and have a bit of stretch in the side panel so he can over stuff his bag. After talking over the bag with Chad, I went to my local shop to track down and trace a Large Moonlander Frame.
 |
| Step One - Trace the Frame |
Unfortunately, the shop near me that carries Surlys didn't have a large Moonlander in stock. So I traced a large Pugsley frame. After checking Surly's website, I noticed that while the frames are similar, there are some differences in the seat tube angles. So I checked in with Chad and asked him to measure the interior dimensions of his bike.
 |
| Paper Patterns |
With the interior dimensions and the location of his front derailleur clamp as well as the location of the external water bottle braze-ons, I was able to draw out the pattern for Chad's frame bag.
 |
| Velcro Strips Sewn & Ready to Go |
Pattern drafted, I began cutting the bits and pieces that go into the frame bag. Starting with the velcro, I cut the velcro attachments. My supplier switched to a military spec 1.5 inch wide velcro- so instead of the 2" wide velcro I've been using, I made Chad's bag with 1.5" wide velcro. I back the velcro with a grippy, non-slip fabric that grabs onto frames really well and doesn't scratch the paint.
 |
| Baffle - a foam & cordura packcloth sandwich. |
I also sewed the baffle together: EVA foam sandwiched into cordura pack cloth (yellow for the inside of the bag and black on the outside).
 |
| Lots of Strips go into Making the Drive-side Panel |
 |
| Drive-side Panel Completed |
Once the bits are together, I cut the side panel fabric. The drive side of Chad's bag has lots of long strips of X-Pac, zippers and a 2 way Schoeller Softshell. Once sewn together, it's all one piece, ready for the zipper pulls.
 |
| Siena waits for me to finish! |
With the side panels are constructed, I sew the panels to the baffles, making sure to place and attach the velcro straps.
 |
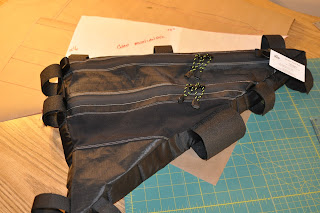
| Frame Bag together, time to finish the interior turn it right side out |
Once the panels are sewn to the baffle, I bind the interior seams and then turn the bag right side out, put on a Hamilton Threadworks hangtag and get it ready to ship to Chad.
 |
| HTW Card attached. |
 |
| All Done & Ready to be Sent to Chad |
Chad - enjoy the bag!


